Final outcome: In-app notifications (as an alternative to tasks/emails):
1- Enable ‘In-app notifications’ for your MDA (Model-driven App).
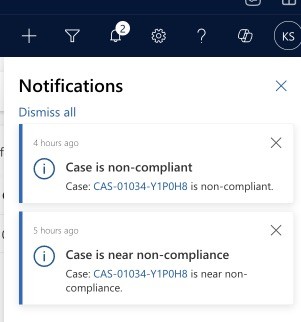
Example scenario: We want to notify a CRM user that a case assigned to them is nearing non-compliance or has reached that state. We want to include a link to the relevant case so that the user can actually use the notification.
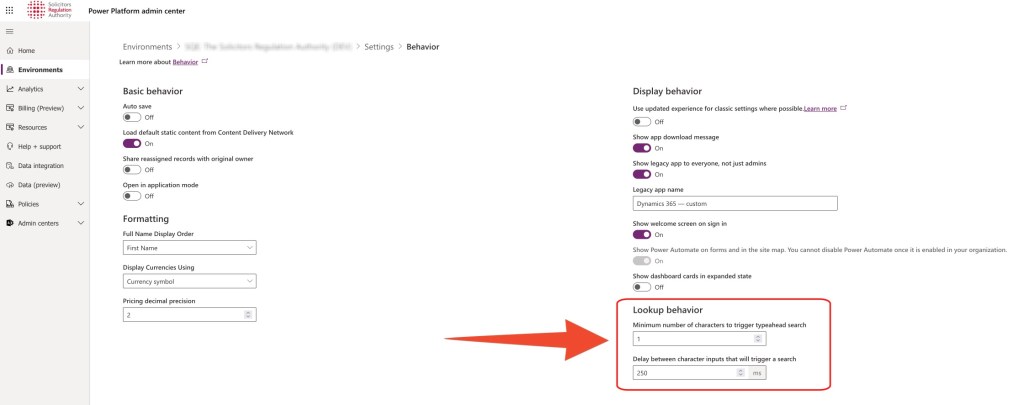
Steps (see screenshot below)
1- Enhanced SLA’s will create a flow for us with the correct trigger (as the ‘Action’.
2- We retrieve the case
3- Create the notification (Action: Add a new row)
4- Body: this is where we want the link to the record to show
NB – you do not need to worry about the environment-specific URL – see this entry here for how to construct that in other scenarios.
Markdown format allows you to easily link to records in CRM – here are the 3 items to consider:
This post shows you how to use the ‘uriHost’ feature on a record’s odata.id to dynamically get the record’s environment URL.
Sometimes it can be required/useful to include a URL to a record, for example when creating a task/email that is regarding the parent record but the action is on a child record.
As far as I can tell, a ‘dynamic record URL’ (as we have them in CRM workflows) is not available via Power Automate.
Yet another Microsoft 'feature'.
This means we have to concatenate the URL ourselves. The most important part is to get the environment variable correct, so that the flow can be deployed to other environments. The building blocks are:
1- ‘Get’ the record for which you want to build the URL (you might already have this via the trigger)
2- Extract the environment URL
Using a ‘compose’ action, manipulate the data.id from the target record:
uriHost(body('Get_a_row_by_ID')?['@odata.id'])
3- Concatenate the URL
BLUE – This is the environment URL extracted in the previous step
RED – This is the table in which the record resides
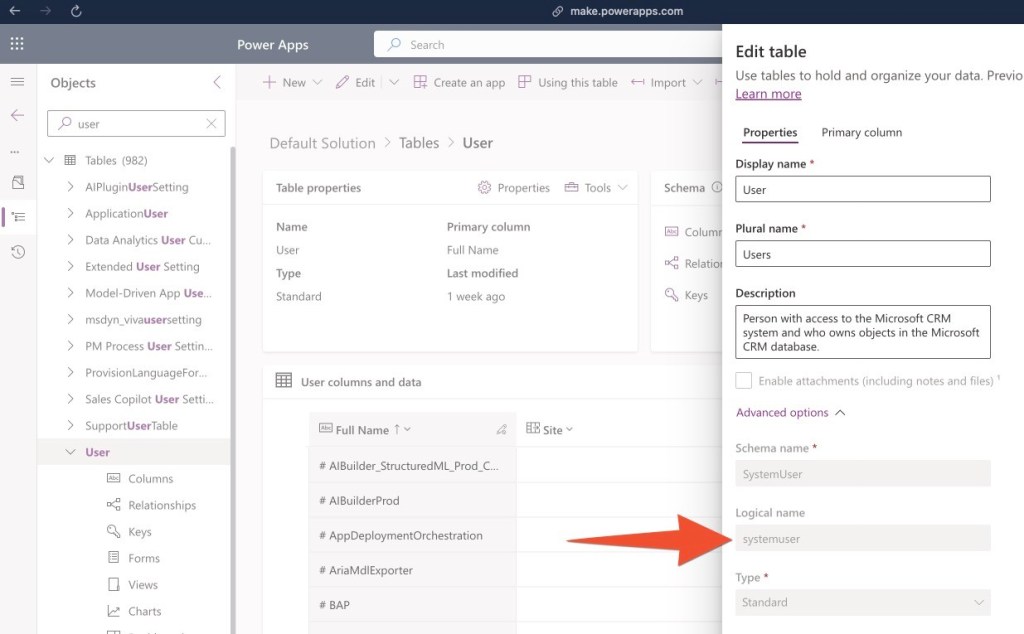
When setting a Dataverse lookup via Power Automate, use the table’s logical name and append an ‘s’ to it.
When creating/updating a record in Dataverse (Dynamics CRM) we often need to set lookups.
To set a lookup, we need to pass in the GUID of the record and tell Power Automate which table to find the record in.
For this we use the table’s logical name and append an ‘s’ (NB – this is sometimes referred to as the ‘entitysetname’)
Table Logical Name + s
Another typical Microsoft 'feature' - why not use the schema name or the logical name.... No, instead, let's make up a random rule.
How to find the ‘Logical Name’ for any table
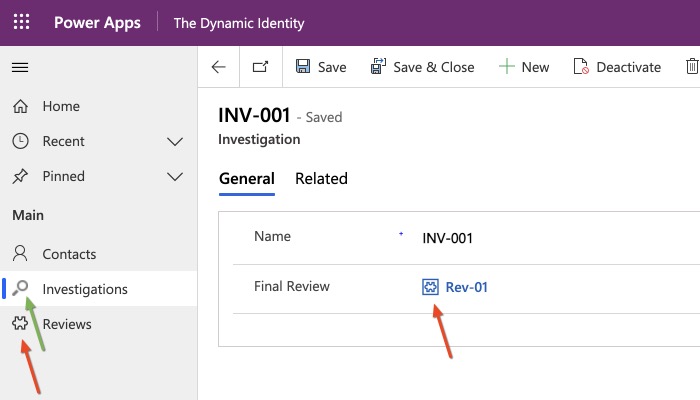
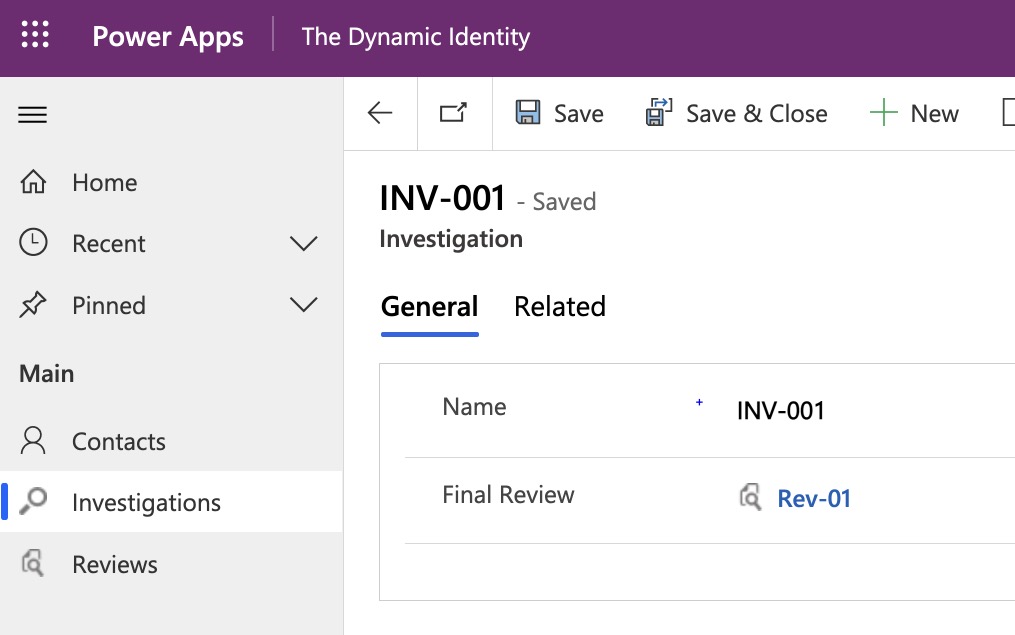
In the example below I am assigning an in-app notification to a CRM user – the concept applies to all entities.
The ‘Users’ table’s logical name is ‘systemuser’, we append and ‘s’ and make it ‘systemusers’, then, in brackets we pass in the GUID of the relevant user, here the ‘Caseworker’ (choose the option with the (Value), this contains the GUID).
This post outlines all required steps for setting up a new table in Dynamics CRM. Completing all of these early on will save a lot of time throughout the life of a project.
You will have to sign up download and install the software first. However once that is done, it will significantly improve the speed at which you can find and download items in the future, as it remembers your settings and let you save items into projects from data retrieval.
Set the colour to black (#FF000000) or dark grey, at least: #FF757474
One advantage of icons8 is that you can customise icons, but adding extra elements to them – just make sure to filter by “Simple small”, as this only shows icons that are available in 16×16 pixels.
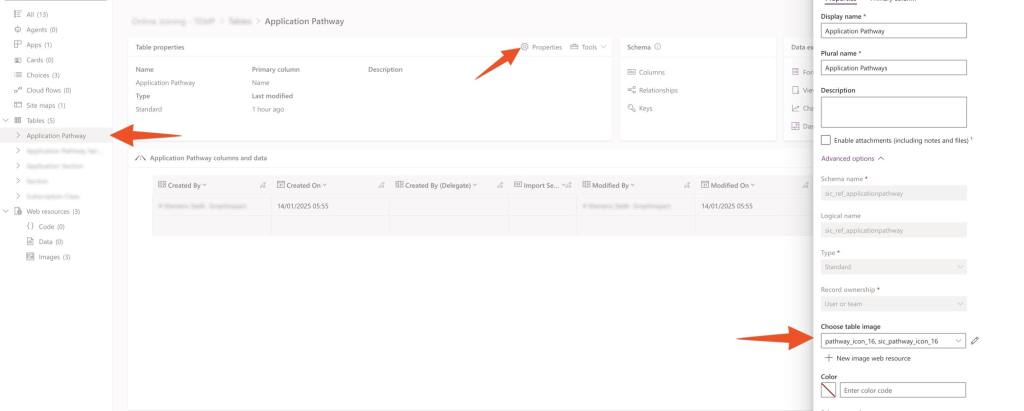
Head over to the make.powerapps.com UI. First, we will need to add the icon as a new webresouce to CRM – go to your web resouce solution, click on new > more > web resource and then upload the png like this – consider a naming pattern to stick to, such as entityname_icon_dimension:
In order to add it to a custom table, navigate to the relevant table, select properties and then add the image there:
That’s it, click on save and reload your MDA – voila!
… was “Keep It Simple, get through the entire process once and then learn from it. Just get through it – don’t overcomplicate it.
Now that didn’t exactly work out the way I planned it.
Distraction #1 – Editing Software
First I looked into which video editing software to use. The obvious contenders were “Davinci Resolve”, “Adobe Premiere Pro” and “Final Cut Pro”.
For multiple reasons, I quickly settled on “Davinci Resolve”:
it’s free! (Final Cut’s $250 is not too scray, Adobe’s $280 per year seems really expensive)
works on both Mac and Windows (when I got started I only had a Windows PC, my MacBook was awaiting shipment)
All reviews on YouTube did not seem to favour one over the other and all are used for blockbuster productions
Distraction #2 – Screen Recording Software
Next up I had to figure out how to record my screen and audio.
For Windows, “OBS Studio” is the obvious choice. It’s relatively easy to learn and has an incredible set of features.
I highly recommend Kevin Stratvert’s video to get started – in fact, all his beginner tutorials are amazing!
(I only realised that it was also available for Mac when writing this post – I had done further research and found “Debut“, which also seems to work well)
Distraction #3 – Script writing in Notion
Next, I spent time trying to write a script based on the blog post. I wanted to start with a proper structure in place, so I headed over to YouTube and search for “How to produce YouTube videos using Notion”
Several hours (or was it days?) later, I settled on Ali Abdaal’s template as a starting point – I still feel a little overwhelmed by it, so I am currently simplifying it to not be scared every time I open it.
I started watching YouTube videos about how to use noggin drama YouTube channel. You can see that quite a bit of time.
I finally settled on a template from Ali Abdaal hyperlink.
Distraction #4 – Thumbnail
This one didn’t take me too long, as I had a pretty good idea of what direction I wanted to go to and how to make them.
I have used “Adobe Express” (rebranded from Adobe Spark) in the past and really liked the speed and ease of it. You can see the final result here.
Now that I was done procrastinating, I thought I was minutes away from my first YouTube video…
Problem # 1 – First Recording
So I started recording my first video, a simple screen recording with voice over explaining how to create a new table in Dynamics CRM.
I had basic bullet points on the screen next to me hit the record button:
Tt is absolutely incredible how the second you turn on the microphone and a screen recorder you lose the ability to put together a single straight sentence in English and even pronounce basic English words correctly. I forgot all the grammar I knew and started stuttering. The script I outlined in my mind magically disappeared and what should have been a two-minute video turned into a 15-minute recording with hardly any useful footage by the end of it.
I have not expected this… and my problems didn’t stop there.
Problem #2 – Audio quality
During my first attempt, I used my “Logitech HD Pro Webcam C920” as a microphone. The audio quality was atrocious.
Back to YouTube for Tips and Tricks on how to improve the audio quality – none of them worked particularly well for me. I also tried recording the audio separately on my iPhone and my iPad Pro, none of which resulted in the desired quality or a workable process to use going forward (holding the iPhone in one hand while using mouse and keyboard with the other hand is less than ideal for the type of video I was trying to make).
Back to YouTube to watch external microphones reviews – a few hours later I had ordered the “Razor Seiren Mini”, as well as a microphone arm and a filter.
Distraction #5 – Audio Quality Review
Before I could even try the Seiren Mini, my new MacBook Pro arrived and I got sidetracked setting it up and wrapping up work before the holidays.
the MacBook Pro’s microphone quality is amazing, so instead of another shot at making the video I recorded a short clip on the various microphones at my disposal – see for yourself what do you think:
Audio comparison: Logitec C920, iPhone 11 Pro, iPad Pro 2019, MacBook Pro 2021 & Seiren Mini
I am simply blown away by the Seiren’s quality – at £35 it is simply incredible!
Conclusion
At the point of writing/ publishing this, I still haven’t successfully recorded/edited or even uploaded my first YouTube video…
I feel that I am close, I am nearly there!
Prediction: I expect there will be a blog post on Procrastination before I upload the video 😅
My new MacBook Pro arrived a few days ago. It took me a couple of days to set it up just the way I like it, but now I am nearly there.
I am working on several posts to show how I set up my Mac to make it “windows-user-friendly” as well as to dive a little deeper into the pros and cons of using a Mac as a “Microsoft Dynamics CRM” consultant.
The most annoying thing so far:
no decent screenshot tool (I use bugshooting on windowns and there is nothing close to it on mac)
the notch – as long as an external display is connected, it is not an issue, as all icons can be seen and interacted with there, however, with just the laptop, there are menu bar icons you simply cannot get to.
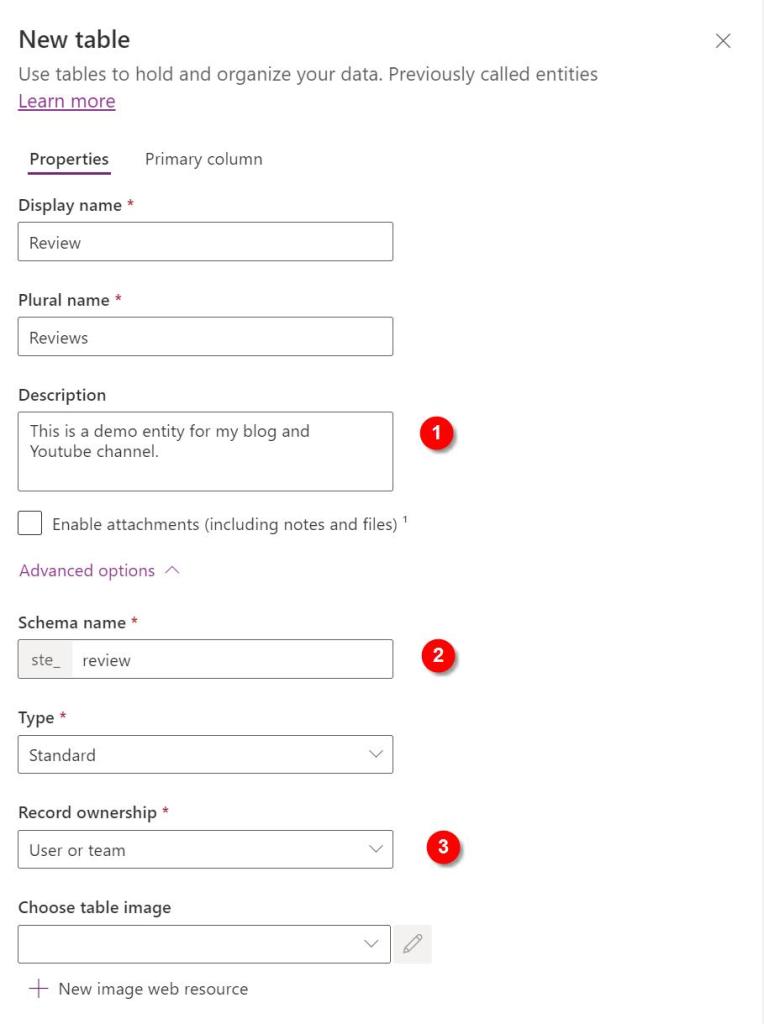
Create a new “Table” (what used to be called “entity”)
After choosing the name (and plural name):
Description: add at least 1 sentence in here – others will thank you later!
Schema name: update the schema name to all lowercase letters (and consider if this is a reference data entity, in which case you should prefix it with “ref_”)
Record ownership: always set this to “User or team”, there are no advantages to chosing “Organization”, only disadvantages.
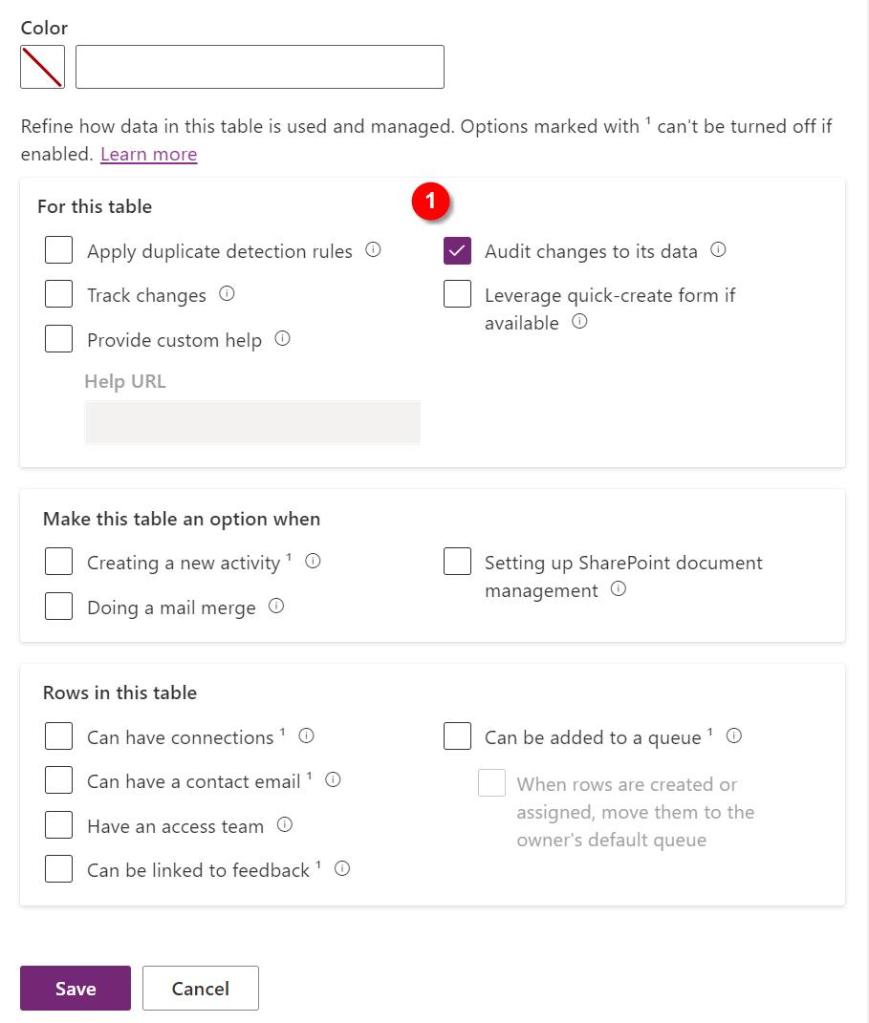
Other setting:
Uncheck all boxes – unless you are certain you will need the feature – these can be checked later if required
consider checking the “Audit changes to its data” – this will likely come in handy during development and testing, as it will allow you to better understand what might have caused an error. To safe space, consider turning this off before releasing into PRODUCTION
Primary column – Schema name:
change the schema name of name field to all lower case
leave it as “name” – this helps later to identify the column containing the name.
That’s it, hit save and the new table will be created.
I recommend that you take a look at my checklist for customising a new table:
[WIP – add the link when the post has been pubished]
You might also want to add a custom icon:
[WIP – add the link when the post has been pubished]
Welcome to my new blog. I will be sharing information related to technology here, specifically, content for Dynamics CRM and the Power platform, my work as a consultant, best practices and “new” things I learned about Dynamics.